Imagine saving money on your water bill while simultaneously helping the environment. Sounds pretty good, right? That's the magic of a rain barrel! And you don't need to be a master builder to set one up yourself. Let's dive into the world of DIY rain barrels, perfectly suited for Canadian homes.
Let's face it: thinking about setting up a rain barrel can feel overwhelming. Where do you even start? What supplies do you need? And what about making sure it's safe and effective, especially with Canadian weather in mind? There's the potential for leaks, mosquito breeding, and even the fear of accidentally contaminating your drinking water. All valid concerns!
This guide aims to demystify the process of installing a DIY rain barrel system at your Canadian home. We'll break down the steps, address common worries, and equip you with the knowledge to create a sustainable and cost-effective water collection system. We'll cover everything from choosing the right barrel to winterizing it for those long, cold months.
This article will provide a comprehensive guide to creating your own rain barrel setup, specifically tailored for Canadian homes and climates. We'll explore choosing the right barrel, connecting it to your downspout, preventing mosquito breeding, winterizing your system, and using the collected water efficiently. We'll cover essential keywords like "rain barrel," "DIY," "Canadian homes," "water conservation," "sustainable gardening," and "winterizing rain barrels." Let's get started!
Choosing the Right Rain Barrel for Your Canadian Home
Choosing the right rain barrel is arguably the most important step. I remember when I first decided to get a rain barrel, I just grabbed the cheapest one I could find. Big mistake! It was flimsy, cracked after the first winter, and was definitelynotmosquito-proof. Lesson learned! The ideal rain barrel for a Canadian home needs to be durable enough to withstand temperature fluctuations and ideally be made of food-grade plastic if you plan on using the water for vegetable gardens. Dark colors help prevent algae growth. Pay close attention to the size. Too small, and you'll be emptying it constantly; too big, and you might have trouble with overflow. Consider the space you have available and the typical rainfall in your area. A good rule of thumb is to choose a barrel that holds at least 50-75 gallons. Look for features like a screened inlet to keep out debris and mosquitoes, an overflow valve to direct excess water away from your foundation, and a spigot for easy access to the collected water. Also, make sure the barrel is opaque to prevent algae growth. Think about connecting multiple barrels together for increased capacity if you have a large roof area. Don't underestimate the importance of a sturdy base to elevate the barrel for better water pressure. It also makes filling watering cans much easier. Finally, check your local municipality for any rebates or incentives for installing rain barrels; you might be surprised!
What is DIY Rain Barrel Setup?
DIY rain barrel setup involves collecting rainwater from your roof and storing it in a container for later use. It's a fantastic way to conserve water, reduce your water bill, and lessen your environmental impact. The basic idea is to intercept the rainwater as it flows through your downspout and redirect it into a rain barrel. This involves cutting the downspout, installing a diverter, and connecting the diverter to the rain barrel. The rain barrel itself is typically a large plastic container, often repurposed from food-grade drums. However, purpose-built rain barrels are also available and often come with features like screens, spigots, and overflow valves. The collected rainwater can then be used for a variety of purposes, such as watering gardens, washing cars, or even flushing toilets (though this requires a more complex filtration system). The beauty of DIY rain barrel setup is its simplicity and affordability. With a few basic tools and materials, you can create a functional and effective water harvesting system. Consider the placement of your rain barrel; it should be close to your garden or other areas where you'll be using the water. Ensure that the area is level and can support the weight of a full rain barrel. Remember, a full 55-gallon barrel weighs over 450 pounds! Regularly inspect your rain barrel for leaks or damage, and clean out any debris that may accumulate inside. A well-maintained rain barrel can provide years of sustainable water conservation.
History and Myths of DIY Rain Barrel Setup
The practice of collecting rainwater dates back thousands of years. Ancient civilizations, like those in Rome and China, relied on rainwater harvesting for drinking water and irrigation. Evidence suggests that rainwater harvesting systems were used as early as the 3rd millennium BC. Over time, different cultures developed their own techniques and technologies for collecting and storing rainwater. In many parts of the world, rainwater harvesting was essential for survival, especially in arid and semi-arid regions. In more recent history, the popularity of rainwater harvesting has waxed and waned, often influenced by the availability and cost of municipal water supplies. However, with increasing concerns about water scarcity and environmental sustainability, there has been a resurgence of interest in rainwater harvesting in recent years. Now, let's debunk some myths. One common myth is that rainwater is too acidic to use on plants. While rainwater can be slightly acidic due to atmospheric pollutants, it's generally much better for plants than treated tap water, which often contains chlorine and other chemicals. Another myth is that rainwater harvesting is illegal. In most areas, it is perfectly legal to collect rainwater, although some jurisdictions may have regulations regarding the size of storage containers or the intended use of the water. Always check your local bylaws before installing a rain barrel system. Finally, some people believe that rainwater harvesting is only beneficial in areas with high rainfall. However, even in drier climates, collecting rainwater can significantly reduce your reliance on municipal water and help conserve a precious resource.
Hidden Secrets of DIY Rain Barrel Setup
One of the biggest "secrets" to successful rain barrel setup is proper maintenance. It’s not enough to just install the barrel and forget about it. Regular cleaning and inspection are crucial. Algae growth is a common problem, especially in sunny locations. A simple solution is to add a few tablespoons of bleach to the water every few months to inhibit algae growth. However, be sure to stop using the bleach treatment a few weeks before using the water on plants or vegetables. Mosquitoes are another major concern. Even a small amount of standing water can become a breeding ground for mosquitoes. To prevent this, make sure your rain barrel has a tight-fitting lid and a fine mesh screen to prevent mosquitoes from entering. You can also add mosquito dunks, which are safe for plants and animals, to the water to kill mosquito larvae. Another secret is to maximize the efficiency of your rain barrel system by using a soaker hose. A soaker hose slowly releases water directly into the soil, reducing water waste and promoting healthy plant growth. You can connect a soaker hose directly to the spigot of your rain barrel and let gravity do the work. Consider adding a pressure reducer to your hose setup if you get too much water pressure flowing through the hose, this will help give your plants time to soak up the water. Finally, don't underestimate the power of education. Learn as much as you can about rainwater harvesting and share your knowledge with others. The more people who embrace this sustainable practice, the better.
Recommendation of DIY Rain Barrel Setup
My top recommendation for anyone considering a DIY rain barrel setup is to invest in quality components. Don't skimp on the diverter, spigot, or connectors. Cheap parts are more likely to leak or break, leading to frustration and wasted water. I highly recommend using a downspout diverter that allows you to switch between directing water into the barrel and allowing it to flow through the downspout as normal. This is especially useful during heavy rain events or when the barrel is full. Also, consider getting a rain barrel stand or base. Elevating the barrel not only makes it easier to fill watering cans but also increases water pressure. When choosing a location for your rain barrel, consider proximity to your garden or other areas where you'll be using the water. The shorter the distance, the easier it will be to transport the water. Also, think about aesthetics. While functionality is important, you also want your rain barrel to look good in your yard. There are many ways to decorate or camouflage a rain barrel, from painting it to building a decorative enclosure around it. Another recommendation is to start small. If you're new to rainwater harvesting, begin with a single rain barrel and gradually expand your system as you gain experience. This will allow you to learn the ropes without feeling overwhelmed. Finally, don't be afraid to experiment. There are many different ways to set up a rain barrel system, so find what works best for you and your unique needs.
Calculating Your Rainwater Harvesting Potential
To make the most of your rain barrel, it's helpful to calculate how much rainwater you can potentially collect. The amount of rainwater you can harvest depends on the size of your roof and the amount of rainfall in your area. A simple formula to estimate your rainwater harvesting potential is: Collection Potential (in gallons) = Roof Area (in square feet) x Rainfall (in inches) x 0.623. The
0.623 factor accounts for runoff coefficient and conversion to gallons. For example, if your roof area is 1,000 square feet and your average annual rainfall is 30 inches, your collection potential would be 1,000 x 30 x
0.623 = 18,690 gallons per year. Of course, this is just an estimate. The actual amount of water you collect may vary depending on factors such as the pitch of your roof, the type of roofing material, and the efficiency of your gutter system. To get a more accurate estimate, you can use online rainwater harvesting calculators or consult with a local expert. Once you know your rainwater harvesting potential, you can determine the appropriate size and number of rain barrels for your needs. You can also use this information to justify the cost of your rain barrel system and demonstrate its environmental benefits. Remember, even a small rain barrel can make a big difference in conserving water and reducing your reliance on municipal water supplies. By calculating your rainwater harvesting potential, you can make informed decisions about your rain barrel setup and maximize its effectiveness.
Tips for Efficient Rain Barrel Use
Once your rain barrel is set up, it's time to start using the collected rainwater efficiently. One of the best ways to conserve water is to use it wisely in your garden. Water deeply and less frequently to encourage deep root growth, which will make your plants more drought-tolerant. Avoid watering during the hottest part of the day to minimize evaporation. Instead, water early in the morning or late in the evening. Use a watering can or soaker hose to deliver water directly to the roots of your plants, avoiding unnecessary watering of the foliage. Mulch around your plants to help retain moisture in the soil. Organic mulches, such as wood chips or straw, also improve soil health. Another tip is to prioritize your water use. Focus on watering plants that are most sensitive to drought stress, such as vegetables and flowering plants. Drought-tolerant plants, such as succulents and native species, can often survive on rainwater alone. Consider using rainwater for other purposes besides watering your garden. You can use it to wash your car, clean your patio, or even flush toilets (with a proper filtration system). Just be sure to use non-toxic cleaning products when washing your car or patio. Finally, monitor your water usage and adjust your watering schedule as needed. Pay attention to the weather forecast and water accordingly. During periods of heavy rain, you may not need to water your garden at all. By following these tips, you can maximize the efficiency of your rain barrel system and conserve water effectively.
Maintaining Your Rain Barrel Over Time
Maintaining your rain barrel is crucial for its longevity and effectiveness. Regularly inspect your rain barrel for leaks or damage. Check the spigot, connectors, and seams for any signs of wear and tear. Repair any leaks promptly to prevent water loss. Clean your rain barrel at least once a year to remove any sediment, debris, or algae that may have accumulated inside. Drain the barrel completely and scrub the interior with a brush and mild soap. Rinse thoroughly before refilling. Clean your gutters regularly to prevent debris from clogging your downspout and entering your rain barrel. Remove any leaves, twigs, or other debris that may have accumulated in your gutters. Check the screen on your rain barrel regularly and clean it as needed. The screen prevents debris from entering the barrel and keeps mosquitoes out. Winterize your rain barrel before the first freeze. Disconnect the diverter and allow the downspout to flow freely. Drain the rain barrel completely to prevent it from freezing and cracking. Store the rain barrel in a sheltered location, such as a garage or shed, or turn it upside down to prevent water from accumulating inside. By following these simple maintenance tips, you can keep your rain barrel in good condition for years to come and ensure that it continues to provide a valuable source of water for your garden and other uses.
Fun Facts of this DIY Rain Barrel Setup
Did you know that a single inch of rain on a 1,000 square foot roof can yield approximately 623 gallons of water? That's a lot of potential water to collect! Another fun fact is that rainwater is naturally soft and free of minerals and chemicals, making it ideal for watering plants. Rainwater is also slightly acidic, which can help improve soil p H and promote healthy plant growth. Rain barrels can also help reduce stormwater runoff, which can pollute rivers, lakes, and oceans. By collecting rainwater, you're helping to prevent flooding and erosion. The world's largest rainwater harvesting system is located in Tokyo, Japan. The system collects rainwater from the roofs of several skyscrapers and uses it for flushing toilets, irrigating gardens, and other non-potable uses. Some cities offer rebates or incentives for installing rain barrels. Check with your local municipality to see if you're eligible for a discount. Rain barrels can be made from a variety of materials, including plastic, wood, and metal. However, plastic rain barrels are the most common and affordable option. You can decorate your rain barrel to make it more visually appealing. Paint it, add stencils, or even build a decorative enclosure around it. Rainwater harvesting is an ancient practice that has been used for thousands of years. Civilizations in ancient Rome, Greece, and China all used rainwater harvesting systems. By installing a rain barrel, you're joining a long tradition of sustainable water management. Finally, rain barrels can help you save money on your water bill. The amount of money you save will depend on your water usage and the amount of rainfall in your area, but even a small savings can add up over time.
How to DIY Rain Barrel Setup
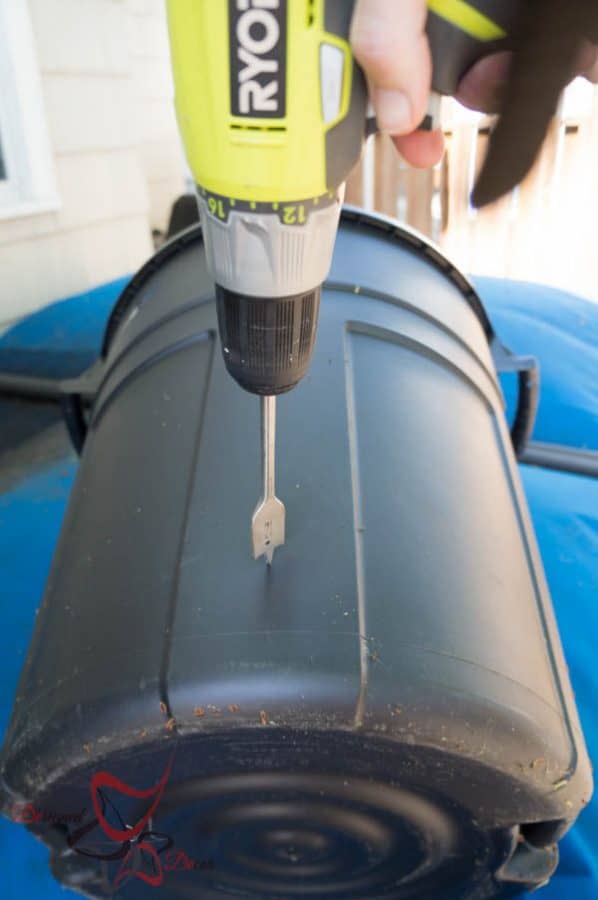
Setting up a DIY rain barrel is a straightforward process. First, gather your materials. You'll need a rain barrel (typically 50-75 gallons), a downspout diverter, a spigot, a screen to prevent debris and mosquitoes, and any necessary connectors or adapters. You'll also need basic tools like a saw, drill, and measuring tape. Next, choose a location for your rain barrel. It should be close to your downspout and on a level surface. Make sure the area can support the weight of a full rain barrel (over 400 pounds for a 50-gallon barrel). If necessary, build a base or platform to elevate the barrel. Cut your downspout to create an opening for the diverter. The height of the opening will depend on the type of diverter you're using. Install the downspout diverter according to the manufacturer's instructions. The diverter will redirect rainwater from the downspout into the rain barrel. Drill a hole near the bottom of the rain barrel for the spigot. Attach the spigot using the appropriate connectors and sealant. Install the screen on top of the rain barrel to prevent debris and mosquitoes from entering. Connect the diverter to the rain barrel using a hose or other flexible tubing. Make sure the connection is secure and watertight. Test your rain barrel system by waiting for the next rain event. Observe how the water flows into the barrel and make any necessary adjustments. Once your rain barrel is set up, remember to maintain it regularly. Clean the screen, check for leaks, and winterize the barrel before the first freeze. With a little effort, you can create a sustainable and cost-effective water harvesting system.
What if DIY Rain Barrel Setup
What if everyone installed a rain barrel? The collective impact on water conservation and environmental sustainability would be significant. Reduced demand on municipal water supplies would alleviate pressure on water treatment plants and reservoirs. Lower water bills for homeowners would free up resources for other needs. Reduced stormwater runoff would lessen the risk of flooding and erosion. Improved water quality in rivers, lakes, and oceans would benefit aquatic ecosystems. Increased awareness of water conservation would encourage other sustainable practices. A greater sense of community responsibility for environmental stewardship would foster a more sustainable future. Of course, there are also potential challenges to consider. Increased demand for rain barrels could lead to shortages and price increases. Improper installation or maintenance of rain barrels could result in leaks, mosquito breeding, or other problems. Local regulations may need to be updated to address the widespread adoption of rain barrels. However, the potential benefits of widespread rain barrel adoption far outweigh the challenges. By embracing this simple and sustainable practice, we can create a more resilient and environmentally friendly society. So, what if you installed a rain barrel? You would be contributing to a better future for yourself, your community, and the planet.
Listicle of DIY Rain Barrel Setup
Here's a quick listicle of essential tips for DIY rain barrel setup:
1.Choose the right barrel: Opt for a durable, opaque, and food-grade container.
2.Install a downspout diverter: This allows you to direct water into the barrel when needed.
3.Elevate the barrel: Use a sturdy base to increase water pressure.
4.Add a screen: Prevent debris and mosquitoes from entering the barrel.
5.Connect multiple barrels: Increase your water storage capacity.
6.Use a soaker hose: Deliver water efficiently to your plants.
7.Maintain your system: Clean the barrel and screen regularly.
8.Winterize properly: Disconnect and drain the barrel before the first freeze.
9.Check local regulations: Ensure compliance with any bylaws.
10.Enjoy the benefits: Save water, save money, and help the environment!
Question and Answer
Here are some common questions about DIY rain barrel setup:
Q: Is it legal to collect rainwater in Canada?
A: Yes, in most areas of Canada, it is legal to collect rainwater. However, some municipalities may have specific regulations regarding the size of storage containers or the intended use of the water. It's always a good idea to check with your local authorities before installing a rain barrel system.
Q: How do I prevent mosquitoes from breeding in my rain barrel?
A: The best way to prevent mosquitoes is to ensure that your rain barrel has a tight-fitting lid and a fine mesh screen to prevent mosquitoes from entering. You can also add mosquito dunks, which are safe for plants and animals, to the water to kill mosquito larvae.
Q: Can I use rainwater for drinking?
A: Rainwater is generally not safe for drinking without proper filtration and treatment. Rainwater can be contaminated by pollutants from the atmosphere or from your roof. If you plan to use rainwater for drinking, you'll need to install a complex filtration system that includes sediment filters, carbon filters, and UV sterilization.
Q: How do I winterize my rain barrel?
A: Before the first freeze, disconnect the diverter and allow the downspout to flow freely. Drain the rain barrel completely to prevent it from freezing and cracking. Store the rain barrel in a sheltered location, such as a garage or shed, or turn it upside down to prevent water from accumulating inside.
Conclusion of DIY Rain Barrel Setup for Canadian Homes
Setting up a DIY rain barrel system is a rewarding project that offers numerous benefits for Canadian homeowners. By following the steps outlined in this guide, you can create a sustainable and cost-effective water harvesting system that will help you conserve water, save money, and protect the environment. From choosing the right barrel to winterizing it for those long Canadian winters, you're now equipped with the knowledge to get started. So, take the plunge and start harvesting the rain!