Imagine a world where your garden thrives year after year, bursting with the same delicious tomatoes, vibrant peppers, and crisp beans you love, all grown from seeds you saved yourself. No more relying on store-bought packets or worrying about seed shortages. Sound good? It's more achievable than you might think!
Many Canadian gardeners feel a pang of frustration when facing the end of the growing season. All that hard work, nurturing those plants, only to watch it all fade away? The thought of buying new seeds every spring, wondering if they'll even germinate, and dealing with seeds that might not be perfectly suited to your specific microclimate can be discouraging.
This guide is your comprehensive handbook on saving seeds from your favourite Canadian garden vegetables. We'll walk you through the process step-by-step, ensuring you have a bountiful supply of homegrown seeds ready for the next planting season. From selecting the right plants to properly drying and storing your seeds, we'll cover everything you need to know to become a seed-saving expert.
Saving seeds is a rewarding way to connect with nature, preserve genetic diversity, and become more self-sufficient. We'll explore selecting open-pollinated varieties, understanding seed maturity, proper harvesting techniques, and crucial drying and storage methods. Learn about specific techniques for saving seeds from tomatoes, peppers, beans, squash, and more. With a little knowledge and practice, you can create a sustainable seed bank right in your own backyard. So, let's dive in and learn how to save seeds from your Canadian garden!
Why Save Seeds From Your Canadian Garden?
Saving seeds isn't just about saving money; it's about cultivating a deeper connection with your garden and the plants you nurture. I remember the first time I saved tomato seeds. I had this particularly delicious heirloom tomato, the kind that tasted like sunshine and summer. I couldn't bear the thought of not having it again the following year. Saving those seeds felt like preserving a piece of that perfect tomato, a little bit of magic I could recreate. It's about more than just the fruit; it's about the lineage, the adaptation to your specific garden conditions, and the satisfaction of being a part of the plant's lifecycle. Plus, seeds from your own garden are more likely to thrive in your local climate. Over time, saved seeds become more and more adapted to your specific growing conditions, leading to healthier, more productive plants. You're essentially creating a lineage of super-plants perfectly suited for your backyard! This process also helps preserve genetic diversity, especially important for heirloom varieties that might be less readily available commercially. And let's be honest, there's a certain pride in knowing you're not entirely reliant on outside sources for your garden's success. It's a step towards self-sufficiency and a deeper understanding of the natural world.
Choosing the Right Vegetables for Seed Saving
The first key to successful seed saving lies in understanding plant pollination and variety types. We need to focus on open-pollinated (OP) varieties rather than hybrids. OP varieties produce seeds that will grow "true to type," meaning the offspring will closely resemble the parent plant. Hybrid varieties (often labeled F1) are crosses between two different parent plants, and their seeds will not reliably produce the same characteristics as the original hybrid. Think of it like breeding dogs – a purebred will consistently produce puppies of the same breed, whereas a mixed breed will produce pups with unpredictable traits. Selecting open-pollinated varieties ensures that the seeds you save will produce plants with the same desirable qualities as the original. Look for seed packets that specifically state "open-pollinated" or heirloom.When choosing which plants to save seeds from, select the healthiest, most vigorous specimens that exhibit the traits you desire. For example, if you're saving tomato seeds, choose fruits from plants that produced abundant, flavorful tomatoes. Avoid saving seeds from plants that showed signs of disease or weakness. This process of selecting the best plants for seed saving is a form of natural selection, helping to improve the overall quality of your future crops.
The History and Mythology of Seed Saving
Seed saving is an ancient practice, dating back to the dawn of agriculture. For millennia, farmers and gardeners have carefully selected and saved seeds from their best crops, ensuring a continued food supply and preserving valuable traits. Seed saving represents a profound connection to the land and a deep understanding of plant life cycles. In many cultures, seed saving was not just a practical activity, but a sacred one, imbued with ritual and symbolism. Seeds were seen as symbols of life, renewal, and abundance, and their preservation was considered essential for the survival of the community. Myths and folklore often revolved around seeds, celebrating their power to sustain life and connect generations. In some traditions, specific seeds were associated with particular deities or spirits, and their saving was accompanied by prayers and offerings. Understanding the historical and cultural significance of seed saving can deepen our appreciation for this vital practice and inspire us to continue the tradition for future generations. Seed saving also played a crucial role in the development of regional food cultures. By selecting and saving seeds from plants that thrived in their specific local conditions, farmers created unique varieties that were perfectly adapted to their environment. These heirloom varieties represent a rich tapestry of agricultural heritage, reflecting the ingenuity and resourcefulness of generations past.
Unlocking the Secrets of Successful Seed Drying
Proper drying is absolutely critical for long-term seed storage and viability. Seeds need to be thoroughly dried to prevent mold and rot. The ideal moisture content for most seeds is around 8-10%. There are several methods for drying seeds, but the most common is air-drying. Spread the seeds in a single layer on a screen or paper towel in a well-ventilated area away from direct sunlight. Avoid using heat to dry seeds, as this can damage them. A cool, dry environment is ideal. Depending on the type of seed and the humidity levels, drying can take anywhere from a few days to a couple of weeks. You'll know the seeds are dry enough when they become brittle and snap easily. Another method for drying seeds is to use silica gel desiccant. Place the seeds in an airtight container with a packet of silica gel, which will absorb excess moisture. Be sure to check the seeds regularly to ensure they don't become too dry. Once the seeds are thoroughly dry, store them in an airtight container in a cool, dark, and dry place. A refrigerator or freezer is ideal for long-term storage, but be sure to dry the seeds thoroughly before freezing them to prevent ice crystal formation. Label the containers with the date of harvest and the variety of seed. With proper drying and storage, you can keep your seeds viable for several years, ensuring a continuous supply of homegrown goodness.
Specific Seed Saving Techniques: Tomatoes, Peppers, and Beans
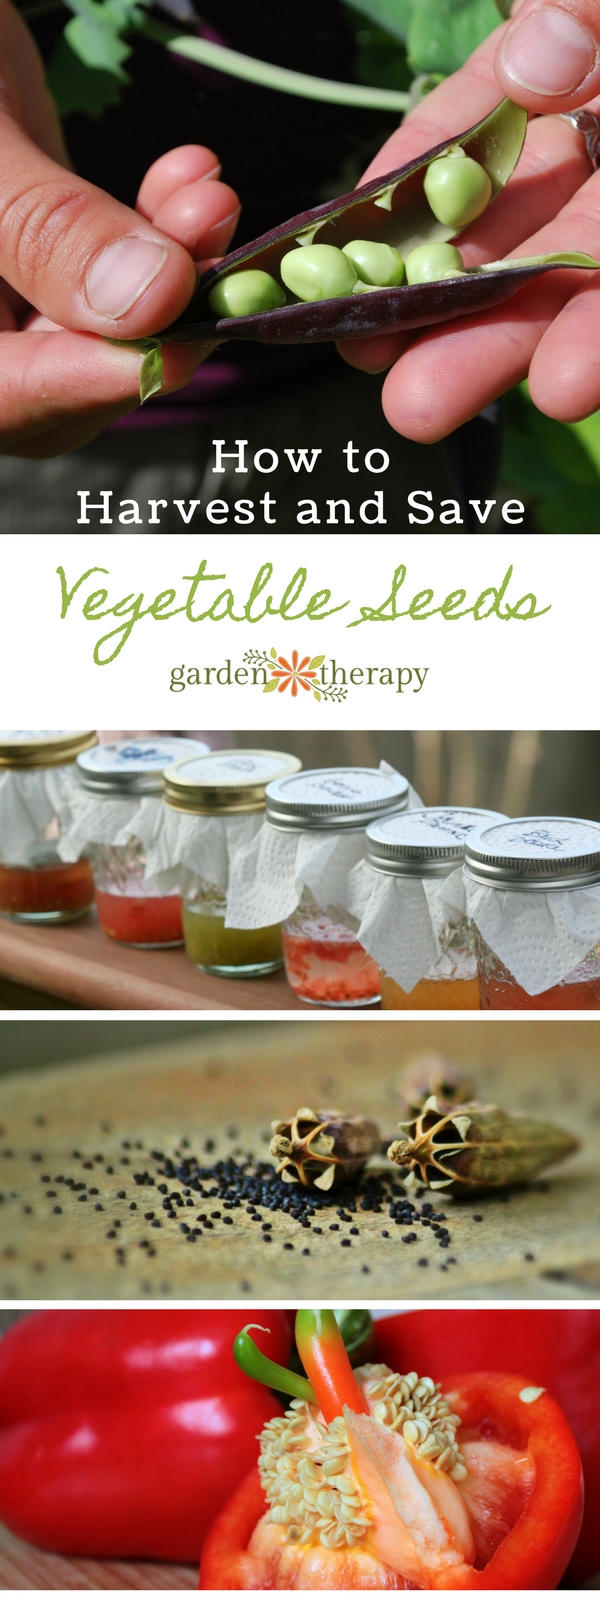
Each vegetable has its own unique seed-saving requirements. Let's start with tomatoes. Tomato seeds are encased in a gelatinous sac that contains germination inhibitors. To remove this sac, you need to ferment the seeds. Squeeze the seeds and pulp into a jar, add a little water, and let it sit for 3-4 days, stirring daily. A layer of mold will form on top, which is perfectly normal. This process breaks down the gelatinous sac and makes the seeds easier to clean. After fermentation, rinse the seeds thoroughly and spread them out to dry. For peppers, the process is much simpler. Simply allow the peppers to ripen fully on the plant, then remove the seeds and dry them. Wear gloves when handling hot peppers, as the oils can irritate your skin. Bean seeds are also relatively easy to save. Allow the bean pods to dry completely on the plant. Once the pods are dry and brittle, crack them open and remove the seeds. Ensure the seeds are thoroughly dry before storing them. Different bean varieties can cross-pollinate, so it's best to isolate different varieties to maintain genetic purity. By understanding the specific requirements of each vegetable, you can ensure successful seed saving and maintain the quality of your homegrown crops.
Tips and Tricks for Long-Term Seed Storage
Proper storage is just as important as proper drying when it comes to maintaining seed viability. The goal is to keep the seeds cool, dry, and dark. Airtight containers are essential to prevent moisture from seeping in. Glass jars with tight-fitting lids are a great option, as are plastic containers specifically designed for food storage. Consider adding a desiccant to the container to absorb any residual moisture. Silica gel packets or even dried rice can work well. Label each container clearly with the date of harvest, the variety of seed, and any other relevant information. This will help you keep track of your seed collection and ensure you're using the oldest seeds first. For long-term storage, the refrigerator or freezer is ideal. However, it's crucial to dry the seeds thoroughly before freezing them to prevent ice crystal formation, which can damage the seeds. Place the seeds in an airtight container and then in a freezer bag to provide an extra layer of protection. When you're ready to use the seeds, allow them to thaw slowly at room temperature before opening the container. Avoid exposing the seeds to rapid temperature changes, as this can also damage them. Regularly check your seed collection to ensure the seeds are still viable. A simple germination test can help you determine the viability of your seeds. By following these tips and tricks, you can extend the life of your seeds and ensure a continuous supply of homegrown goodness for years to come.
Troubleshooting Common Seed Saving Problems
Even with the best intentions, seed saving can sometimes present challenges. One common problem is low germination rates. This can be caused by a variety of factors, including improper drying, poor storage, or simply old seeds. If you're experiencing low germination rates, try conducting a germination test to assess the viability of your seeds. Another common problem is cross-pollination, which can lead to unexpected results in your future crops. To prevent cross-pollination, isolate different varieties of the same species by a sufficient distance. This is particularly important for crops like squash and beans, which are prone to cross-pollination. Insects can also contribute to cross-pollination, so consider using row covers or other physical barriers to protect your plants. Disease can also be a problem for seed savers. Avoid saving seeds from plants that show signs of disease, as the disease can be transmitted to the seeds and affect your future crops. Practice good garden hygiene to prevent the spread of disease. Remove any diseased plant material promptly and avoid overhead watering, which can create a favorable environment for disease development. By understanding these common problems and taking steps to prevent them, you can increase your chances of successful seed saving and maintain the quality of your homegrown crops.
Fun Facts About Seed Saving
Did you know that some seeds can remain viable for hundreds or even thousands of years? In 2005, scientists germinated 2,000-year-old date palm seeds found in an ancient jar in Israel! This incredible feat highlights the remarkable resilience of seeds and their ability to withstand the test of time. Another fun fact is that seed saving has played a crucial role in preserving biodiversity. Heirloom varieties, which are often passed down through generations, represent a rich tapestry of agricultural heritage and offer a diverse range of flavors, colors, and textures. By saving seeds from these heirloom varieties, we can help ensure that they are not lost to time. Seed saving is also a great way to connect with nature and learn more about the life cycles of plants. By observing the plants in your garden and carefully collecting and saving their seeds, you gain a deeper appreciation for the natural world. And let's not forget the sheer satisfaction of growing your own food from seeds you saved yourself. It's a rewarding and empowering experience that connects you to the land and to generations of gardeners past. So, embrace the fun and fascinating world of seed saving and discover the many benefits it has to offer!
How to Start Your Own Seed Saving Journey
Starting your seed saving journey can feel daunting, but it's actually quite simple! Begin with just one or two of your favorite open-pollinated vegetables. Tomatoes, peppers, and beans are great choices for beginners, as they are relatively easy to save seeds from. Start by selecting the healthiest, most vigorous plants that exhibit the traits you desire. Allow the fruits or pods to ripen fully on the plant. This ensures that the seeds are mature and viable. Once the fruits or pods are ripe, harvest them and extract the seeds. Follow the specific seed-saving techniques for each vegetable, as described earlier in this guide. Be sure to dry the seeds thoroughly before storing them. Label the containers with the date of harvest and the variety of seed. Store the seeds in a cool, dry, and dark place. Over time, you can expand your seed collection by saving seeds from more and more varieties. As you gain experience, you'll become more confident in your seed-saving abilities and be able to save seeds from a wider range of vegetables. Don't be afraid to experiment and learn from your mistakes. Seed saving is a journey, and there's always something new to discover. Most importantly, have fun and enjoy the process of connecting with nature and preserving your garden's bounty!
What If Seed Saving Doesn't Go as Planned?
Even with the best efforts, seed saving can sometimes be unpredictable. Seeds may not germinate, plants may not grow true to type, or diseases may strike. Don't be discouraged! These challenges are all part of the learning process. If your seeds don't germinate, consider conducting a germination test to assess their viability. It's possible that the seeds were not properly dried or stored, or that they were simply too old. If your plants don't grow true to type, it's likely due to cross-pollination. In the future, take steps to isolate different varieties of the same species. If diseases strike, remove any affected plants promptly and practice good garden hygiene to prevent the spread of disease. Consider choosing disease-resistant varieties in the future. Remember that seed saving is a journey, not a destination. There will be successes and failures along the way. The key is to learn from your mistakes and keep experimenting. Don't be afraid to ask for help from experienced seed savers in your community. There are many resources available to help you succeed, including books, websites, and local seed saving organizations. Embrace the challenges and enjoy the process of learning and growing as a seed saver!
Top 5 Reasons to Save Seeds from Your Garden
Here's a quick listicle highlighting why saving seeds is so beneficial. First, saving seeds saves you money. No more buying new seed packets every year! Second, you're creating seeds adapted to your local climate. Over time, your saved seeds will produce plants that are better suited to your specific growing conditions. Third, you're helping to preserve genetic diversity. Heirloom varieties offer a wide range of flavors, colors, and textures that are worth preserving. Fourth, it promotes self-sufficiency. You'll be less reliant on outside sources for your garden's success. Fifth, it creates a deeper connection with your garden. Seed saving connects you to the life cycles of plants and the traditions of generations past.
Question and Answer About Seed Saving
Here are some common questions about seed saving:
Question 1: What are open-pollinated seeds?
Answer: Open-pollinated seeds are seeds that produce plants that are true to type, meaning that the offspring will closely resemble the parent plant. These seeds are ideal for seed saving, as they allow you to maintain the desirable traits of your favorite varieties.
Question 2: How do I dry seeds properly?
Answer: Spread the seeds in a single layer on a screen or paper towel in a well-ventilated area away from direct sunlight. Allow the seeds to dry until they become brittle and snap easily. This can take anywhere from a few days to a couple of weeks.
Question 3: How should I store seeds for long-term viability?
Answer: Store seeds in an airtight container in a cool, dry, and dark place. A refrigerator or freezer is ideal for long-term storage, but be sure to dry the seeds thoroughly before freezing them.
Question 4: What if my seeds don't germinate?
Answer: Conduct a germination test to assess the viability of your seeds. If the germination rate is low, it's possible that the seeds were not properly dried or stored, or that they were simply too old. Consider using fresh seeds for best results.
Conclusion of How to Save Seeds from Canadian Garden Vegetables
Saving seeds from your Canadian garden is a rewarding and empowering experience that connects you to nature, preserves genetic diversity, and promotes self-sufficiency. By following the steps outlined in this guide, you can create a sustainable seed bank and enjoy the fruits (and vegetables!) of your labor for years to come. So, embrace the journey, learn from your experiences, and celebrate the abundance of your homegrown garden!